
On implementing Bloom Filters in C
This article assumes the reader is already familiar with the C programming language and some basic concepts concerning hash functions. The target audience (like most of the time on my blog) are undergrad CS students or seasoned developers who, just like me, haven’t learned about Bloom Filters during their University years.
Introduction
If you just want to jump directly into the code, checkout this repository.
As Wikipedia states, Bloom Filters are space-efficient, probabilistic data structures, conceived by Burton Howard Bloom in 1970, used to test whether an element is a member of a set or not. What I find peculiar is that the real Mr. Howard Burton Bloom doesn’t have a wiki page, while the imaginary Mr. Leopold Bloom has one.

To make it short, a Bloom Filter is a data structure where we “add” elements. But after the addition, we cannot recover them further. They are chopped and hashed into pieces, and only a tiny footprint of what they once were remains. Afterward, we can ask the filter a delicate question:
[RandomDeveloper]: Is the element E in the set U or not?
The two possible answers a Bloom Filter can give us are:
[BloomFilter]: I am 100% sure the element E is not in U;
Or:
[BloomFilter]: I am almost sure the element E is in U, but I cannot guarantee you that…
For most of the non-critical scenarios you can think of, even the second answer is satisfactory in the light of how little space a Bloom Filter occupies. For example, you can check Prof. Michael Mitzenmacher ‘s presentation “Bloom Filters, Cuckoo Hashing, Cuckoo Filters, Adaptive Cuckoo Filters, and Learned Bloom Filters”, where he describes the ancient use of Bloom Filters: spellcheckers.
So, once upon a time, when memory was scarce, one of the first spellcheckers was based on a Bloom Filter who occupied 25KB to determine if 210KB of English words had possible spelling mistakes. Even if things have evolved since then, and spellcheckers don’t (necessarily or exclusively) use Bloom Filters anymore, the numbers stand impressive. 25Kb for a killer word editor feature in the early 90s is not that bad.
But, Bloom Filters were not part of the undergrad curricula I’ve taken while studying at the University, and I’ve rarely seen them (directly) used in practice. Even the more experienced engineers tend to ignore their properties and advantages and wrongly (or rather unjustly) replace them with Hash Tables or variously Set implementations. Again, most programming languages don’t have them implemented in their standard libraries.
On the brighter note, they still fit well in various back-end architectures where we need to implement blacklists, or as parts of complex caching systems. For a production implementation check RedisBloom.
In any case, what is particularly interesting about Bloom Filters is that even the most straightforward “book implementation” works decently. Compared, for example, to the extreme arts of implementing an efficient Hash Table, writing yourself an efficient Bloom Filter is more approachable. The knowledge of writing one can fit inside our heads without checking a reference book on Data Structures and Algorithms.
How a Bloom Filter actually works
The best way to understand how Bloom Filters are working is to “visualize” them:
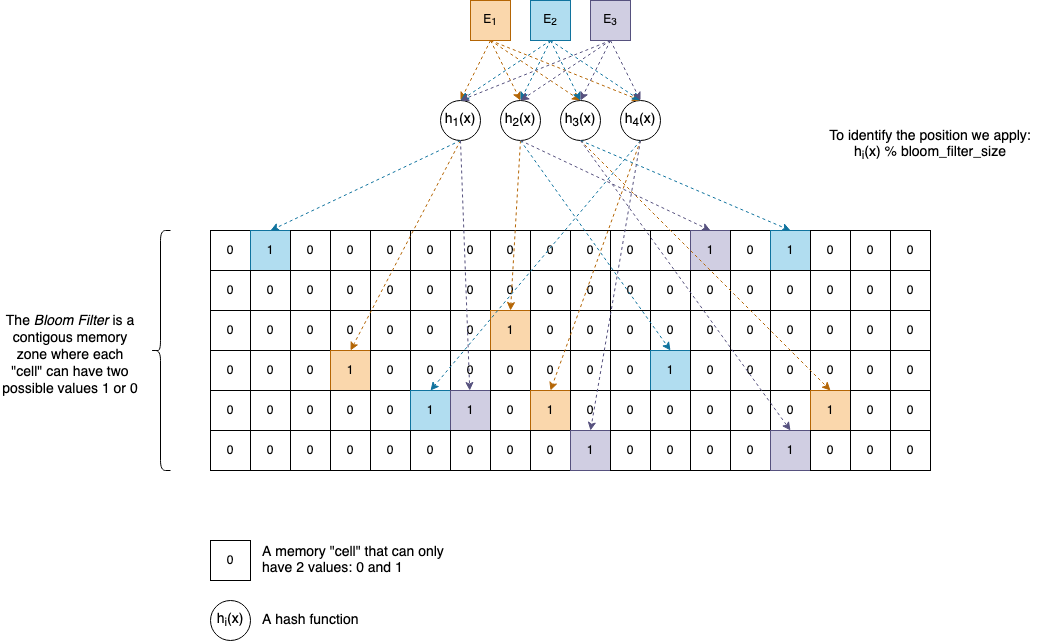
\(E_{1},\ E_{2},\ E_{3},\ \text{...}\) and so on are the elements we want to add to the Bloom Filter. They can be anything, and as many of them are necessary, given there’s enough memory available.
\(h_{1}(x),\ h_{2}(x),\ h_{3}(x),\ h_{4}(x),\ \text{...}\) and so on are (non-cryptographic) hash functions. A Bloom Filter can have as many hash functions associated with it as you want, but usually, in practice, software developers pick a number between 4 and 8. In the section called Interesting ideas to explore, you will see why it’s not necessarily needed to have separate hash functions. One or two are enough to generate the others.
For practical reasons, let’s suppose our functions return uint32_t values, which are natural numbers between \(0\) and \(2^{32}-1\).
Internally a Bloom Filter has an array-like memory zone associated where elements can have only two values: 0 and 1. It’s up to us how we organize this area, but the classical implementation uses a Bit Vector (described later in the article).
Given an element \(E\), to insert it in the Bloom Filter we perform the following actions:
- We compute the hash values of \(E\) by applying each of the hash functions: \(h_{1}(E),\ h_{2}(E),\ h_{3}(E),\ h_{4}(E)\).
- The hash values are
uint32_tnumbers, so we apply% bloom_filter_size(modulo) to find the actual cells’ positions inside the array. We set those positions to1.
To check if an element \(E\) is not in a Bloom Filter, we compute the hash values, and we test the bits again if they are all 1s or not.
So, if our Bloom Filter uses 4 Hash Functions, then for our element E, 4 bits in the array will be 1. If an element is already set to 1 we don’t perform any change.
Of course, hash collisions can happen - when two distinct elements \(E_{1}\) and \(E_{2}\) can have the same hash value.
If the Bit Vector size is too small, the values 1 can also start to overlap with each other, creating what we call false positives.
If you are curious about the math behind it and how to calculate the probability of false positives, the Wikipedia article is quite good:

\(\varepsilon\) is the false positive rate, and to keep it under control, we can fine-tune the actual values of k, n, and m.
The implementation
The full code of this article can be found in this github repo:
git clone git@github.com:nomemory/bloomfilters-c.git
Bit Vector
We assume that for our platform 1 byte is always 8 bits.
Before jumping directly into implementing a Bloom Filter we need to implement first an auxiliary data structure called a Bit Vector (also known as a Bit Array).
A Bit Vector is an array data structure that compactly stores bits, meaning that all the elements from this particular array are either 0 and 1. But in the C programming language, there is no data type as small as 1 bit. The smallest you can get is char which is 8 bits, or uint8_t (and its signed counterpart int8_t) which is also 8 bits. It will be a shame to use that much space to store either 1 or 0 in 8 bits, when you actually need only one.
Initially, I wanted to use a xtrapbits.h, a bulletproof macro implementation that has worked since 1987, simply put, a piece of code that’s about my age. Eventually, I’ve opted to write my straightforward implementation, which you can find in bitutil.c and bitutil.h, stripping down functionality to exactly what I need in the context of Bloom Filters.
Unfortunately, C doesn’t provide support at the language level for Bit Vectors, but fortunately, through the use of pointers and bitwise operations, we can implement them ourselves.
Our Bit Vector will be composed of small uint32_t chunks of memory, but each of those chunks will contain 32 possible values of 1s and 0s.
typedef struct bit_vect_s {
    uint32_t *mem;
    size_t size;        // The number of bits
} bit_vect;
From a memory perspective things will look like this:
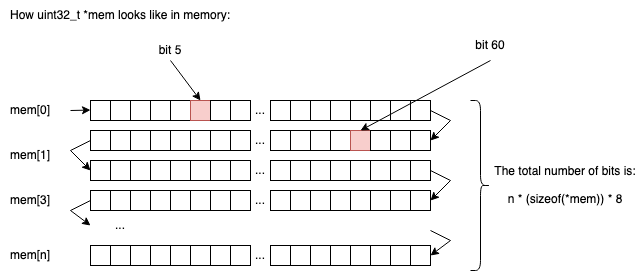
So in n chunks of uint32_t we will be able to store n * sizeof(uint32_t) * 8 elements (1s or 0s).
If n=2, we would be able to store 2 * 4 * 8 = 64 bits.
If n=3, we would be able to store 3 * 4 * 8 = 96 bits.
… and so on
Allocating memory for a new Bit Vector
The method to allocate memory for a new Bit Vector has the following signature, where num_bits represents the (exact) number of bits our Bit Vector will contain:
bit_vect *bit_vect_new(size_t num_bits) ...
Implementing it is relatively straightforward; the only “math” involved is to find out how many uint32_t chunks we need to allocate, as the input parameter num_bits is not necessarily a multiple of a sizeof(uint32_t)*8.
For example, if num_bits=71, we need at least 3 uint32_t chunks: 2 of them will be fully utilized, and from the third one, we will use only 7 bits out of the 32 available, a compromise in wasting resources we can live with.
To put this into code, we will start by declaring the following macros:
#define BITS_IN_BYTE 8
#define BITS_IN_TYPE(type) (BITS_IN_BYTE * (sizeof(type)))
BITS_IN_BYTEOn most modern systems, we expect the number to be 8, but it’s better to isolate this in a constant than to have magic numbers in our code.BITS_IN_TYPEis a function macro that computes the number of bits associated with a type. If we callBITS_IN_TYPE(uint32_t), the result will probably be32on most modern systems.
Later Edit, user nimaje on gitbub mentioned that in
limits.hthere’s already a constantCHAR_BITthat holds the number of bits of a char. Instead of defining your ownBITS_IN_BYTEconstant, it’s a better idea to use this one.
Then we write the actual memory allocator, bit_vect_new:
bit_vect *bit_vect_new(size_t num_bits) {
    bit_vect *vect = malloc(sizeof(*vect));
    if (NULL==vect) {
        fprintf(stderr, "Out of memory.\n");
        exit(EXIT_FAILURE);
    }
    size_t mem_size = num_bits / BITS_IN_TYPE(uint32_t);
    // If num_bits is not a multiplier of BITS_IN_TYPE(uint32_t)
    // We add one more chunk that will be partial occupied
    if (!(num_bits%BITS_IN_TYPE(u_int32_t))) {
        mem_size++;
    }
    vect->mem = calloc(mem_size, sizeof(*(vect->mem)));
    if (NULL==vect->mem) {
        fprintf(stderr, "Out of memory.\n");
        exit(EXIT_FAILURE);
    }
    vect->size = num_bits;
    return vect;
}
Freeing the memory for a bit_vect is straightforward and is done in two steps, in this exact order:
- Free the memory associated with
bit_vect->memfirst; - Free the memory associated with
bit_vectsecond;
void bit_vect_free(bit_vect *vect){
    free(vect->mem);
    free(vect);
}
Getting the value of the nth bit
The function that gets the value of the nth bit from our Bit Vector looks like this:
bool bit_vect_get(bit_vect *vect, size_t bit_idx) {
    if (bit_idx>=vect->size) {
        fprintf(stderr, "Out of bounds bit_idx=%zu, vect->size=%zu\n",
                            bit_idx, vect->size);
        exit(EXIT_FAILURE);
    }
    size_t chunk_offset = bit_idx / BITS_IN_TYPE(uint32_t);
    size_t bit_offset = bit_idx & (BITS_IN_TYPE(uint32_t)-1);
    uint32_t byte = vect->mem[chunk_offset];
    return (byte>>bit_offset) & 1;
}
Firstly, it performs some sanity checks on the input (bit_idx) to see if nth bit we are looking is in between our memory bounds.
Secondly, we need to compute two offsets to determine where the memory location (the bit) we are looking for is situated:
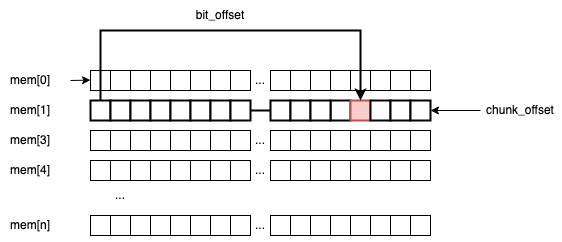
chunk_offsetis theuint32_tframe that holds the bit.bit_offsetis the actual position of the bit inside theuint32_tchunk
For example, if we are searching for bit_idx=60, then: chunk_offset = 60 / 32 = 1, and bit_offset = 60 % 32 = 28.
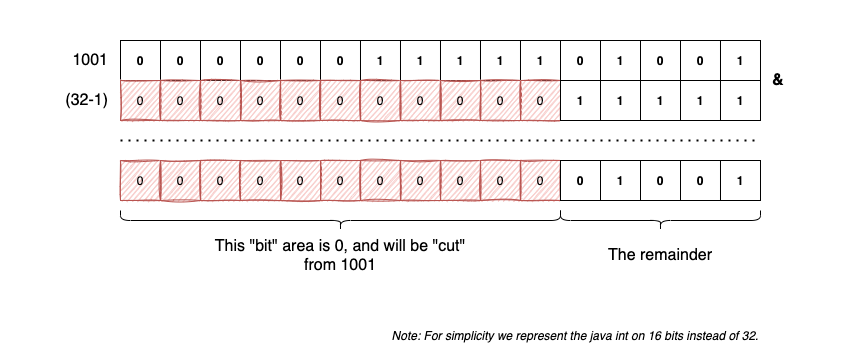
This line bit_idx & (BITS_IN_TYPE(uint32_t)-1) can be a little confusing because you would typically expect the % operation to get the remainder, instead of &(32-1). This simple bitwise trick makes the codes more efficient by reducing the number of operations on the CPU. It only works if the divisor is a power of two (lucky us). I’ve already explained it here, using this diagram.
The last line, (byte>>bit_offset) & 1, extracts the actual value of the bit (by shifting the uint32_t with the bit_offset).
Setting the value of the nth bit
The corresponding code for this operation is the following:
void bit_vect_set(bit_vect *vect, size_t bit_idx, bool val) {
    if (bit_idx>=vect->size) {
        fprintf(stderr, "Out of bounds bit_idx=%zu, vect->size=%zu\n",
                            bit_idx, vect->size);
        exit(EXIT_FAILURE);
    }
    size_t chunk_offset = bit_idx /  BITS_IN_TYPE(uint32_t);
    size_t bit_offset = bit_idx & (BITS_IN_TYPE(uint32_t)-1);
    uint32_t *byte = &(vect->mem[chunk_offset]);
    if (val) {
        // Sets the the `bit_idx` to 1 (true)
        *byte |= ((uint32_t)1) << bit_offset;
    }else {
        // Sets the bit `bit_idx` to 0 (false)
        *byte &= ~(1 << bit_offset);
    }
}
Yet again, we need to compute we compute the chunk_offset and bit_offset, and then we branch off:
*byte |= ((uint32_t)1) << bit_offsetsets the corresponding bit to 1;*byte &= ~(1 << bit_offset)sets the correponding bit to 0;
The hash functions
Just like Hash Tables (previously explained in this article, Bloom Filters make heavy use of Hash Functions. It’s not in the purpose of this article to explain how Hash Functions work, as I’ve already did my best here.
My rule of thumb is to use the sdmm and djb2 functions in toy implementations, and something more advanced like MurmurHash, FNV or spookyhash for serious stuff. Recently I’ve also played with chunky64, and the results good, still I am not sure how popular is this in the real world.
But as I said, the two hash functions I will gonna be using in this article are sdbm and djb2. They are extremely simple, and they work decent enough for our purpose:
uint32_t djb2(const void *buff, size_t length) {
    uint32_t hash = DJB2_INIT;
    const uint8_t *data = buff;
    for(size_t i = 0; i < length; i++) {
         hash = ((hash << 5) + hash) + data[i];
    }
    return hash;
}
uint32_t sdbm(const void *buff, size_t length) {
    uint32_t hash = 0;
    const uint8_t *data = buff;
    for(size_t i = 0; i < length; i++) {
        hash = data[i] + (hash << 6) + (hash << 16) - hash;
    }
    return hash;
}
The only improvement I would make on these two would be to increase the data reading frame size from uint8_t to something bigger, reducing the overall number of >> operations.
Next, we need to make sure is that our hash functions share the same signature, so we can typedef them for further use:
typedef uint32_t (*hash32_func)(const void *data, size_t length);
The main idea is that our Bloom Filter will receive several hash functions in the initialization phase, so doing an alias on the type (by using typedef) will make our code more readable when we pass the function pointers.
The bloom filter
The “interface”
The Bloom’s Filter interface, looks like this:
typedef uint32_t (*hash32_func)(const void *data, size_t length);
typedef struct bloom_filter_s {
    bit_vect *vect;
    hash32_func *hash_functions;
    size_t num_functions;
    size_t num_items;
} bloom_filter;
bloom_filter *bloom_filter_new(size_t size, size_t num_functions, ...);
bloom_filter *bloom_filter_new_default(size_t size);
void bloom_filter_free(bloom_filter *filter);
void bloom_filter_put(bloom_filter *filter, const void *data, size_t length);
void bloom_filter_put_str(bloom_filter *filter, const char *str);
bool bloom_filter_test(bloom_filter *filter, const void *data, size_t lentgth);
bool bloom_filter_test_str(bloom_filter *filter, const char *str);
It’s nothing fancy, just a simple API:
struct bloom_filter_sdefines the internal data-structure:- A
bit_vectwhere we keep our1sand0s; num_itemsthe actual number of bits the Bit Vector has;hash_functionsandnum_functionsfor keeping track of the internal hash functions;
- A
Allocating and de-allocating memory
The code for allocating dynamic memory for our newly defined struct (bloom_filter) is the following:
bloom_filter *bloom_filter_new(size_t size, size_t num_functions, ...) {
    va_list argp;
    bloom_filter *filter = malloc(sizeof(*filter));
    if (NULL==filter) {
        fprintf(stderr, "Out of memory.\n");
        exit(EXIT_FAILURE);
    }
    filter->num_items = 0;
    filter->vect = bit_vect_new(size);
    filter->num_functions = num_functions;
    filter->hash_functions = malloc(sizeof(hash32_func)*num_functions);
    if (NULL==filter->hash_functions) {
        fprintf(stderr, "Out of memory.\n");
        exit(EXIT_FAILURE);
    }
    va_start(argp, num_functions);
    for(int i = 0; i < num_functions; i++) {
        filter->hash_functions[i] = va_arg(argp, hash32_func);
    }
    va_end(argp);
    return filter;
}
bloom_filter *bloom_filter_new_default(size_t size) {
    return bloom_filter_new(size, 2, djb2, sdbm);
}
void bloom_filter_free(bloom_filter *filter) {
    bit_vect_free(filter->vect);
    free(filter->hash_functions);
    free(filter);
}
For an inexperienced eye, the only thing that might look confusing is the ... notation from the bloom_filter_new method signature. bloom_filter_new is basically a variadic function, that accepts an arbitrary number of params num_functions. Those params are actual hash functions (hash32_func).
Adding an element
The code that is adding an element to the Bloom Filter is the following:
- We iterate through all the
hash_functions; - We compute the hash values, and we set to
1the correct values
void bloom_filter_put(bloom_filter *filter, const void *data, size_t length){
    for(int i = 0; i < filter->num_functions; i++) {
        uint32_t cur_hash = filter->hash_functions[i](data, length);
        bit_vect_set1(filter->vect, cur_hash % filter->vect->size);
    }
    // We've just added a new item, we incremenet the value
    filter->num_items++;
}
C doesn’t support polymorphism, so to make it simple for adding a string (char*) to the filter, we simply write a helper function:
void bloom_filter_put_str(bloom_filter *filter, const char *str) {
    bloom_filter_put(filter, str, strlen(str));
}
Testing if an element exists
The code for Testing if an element exists in the Bloom Filter is the following:
- We iterate through all the
hash_functions; - We compute the hash values we check the corresponding values in the
bit_vect.
bool bloom_filter_test(bloom_filter *filter, const void *data, size_t lentgth) {
    for(int i = 0; i < filter->num_functions; i++) {
        uint32_t cur_hash = filter->hash_functions[i](data, lentgth);
        if (!bit_vect_get(filter->vect, cur_hash % filter->vect->size)) {
            return false;
        }
    }
    return true;
}
bool bloom_filter_test_str(bloom_filter *filter, const char *str) {
    return bloom_filter_test(filter, str, strlen(str));
}
Using the Bloom Filter
#include <stdio.h>
#include <stdlib.h>

#include "bloom.h"

int main(int argc, char *argv[]) {

    bloom_filter *filter = bloom_filter_new_default(1024);
    bloom_filter_put_str(filter, "abc");
    printf("%d\n", bloom_filter_test_str(filter, "abc"));
    printf("%d\n", bloom_filter_test_str(filter, "bcd"));
    printf("%d\n", bloom_filter_test_str(filter, "0"));
    printf("%d\n", bloom_filter_test_str(filter, "1"));
    bloom_filter_put_str(filter, "2");
    printf("%d\n", bloom_filter_test_str(filter, "2"));

    return 0;
}
Output:
1
0
0
0
1
Interesting ideas to explore
Re-use hash functions
Following a discussion on reddit, Chris Wellons suggested the fact that Bloom Filters don’t need actual unique k functions. We can only have one that generates a hash value, and from that value, through permutations we can generate as many new hash values as we want:
uint64_t hash64(void *buf, size_t len);
uint64_t permute64(uint64_t, uint64_t key);

uint64_t bufhash = hash64(buf, len);
uint32_t hashes[K];
for (int i = 0; i < K; i++) {
    hashes[i] = permute64(bufhash, i);
}
Where permute64 can look like:
uint64_t permute64(uint64_t x, uint64_t key)
{
    x += key;
    x ^= x >> 30;
    x *= 0xbf58476d1ce4e5b9U;
    x ^= x >> 27;
    x *= 0x94d049bb133111ebU;
    x ^= x >> 31;
}
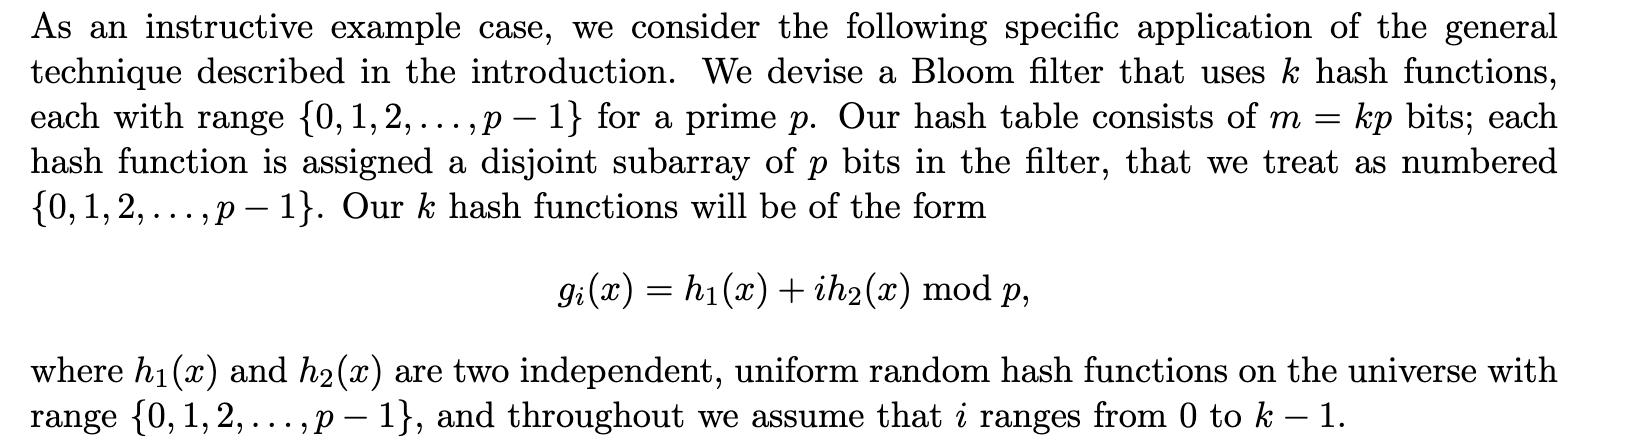
Another interesting idea for avoiding to use multiple (separate) hash functions comes from Building a Better Bloom Filte. The authors suggest that two hash functions \(h_{1}(x)\), and \(h_{2}(x)\) are enough to generate others in the form \(g_{i}(x)\):
Articles, C implementations, and References
If you want to read more about how to implement Bloom Filters in the C language, you can check this article: “How to write a better Bloom Filter” by Drew DeVault.
Another interesting C implementation is bloomd which is a Network Daemon for Bloom Filters written by Armon Dadgar, and even if the project doesn’t seem to be maintained anymore, it is quite an exciting piece of software to look at.
Other references:
- Bloom Filters - Much, much more than a space efficient hashmap!
- A Little Bloom Filter Theory (and a Bag of Filter Tricks)
- Bloom Filters
Going further
A proposed efficient alternative to Bloom Filters the Cuckoo Filters, but before speaking, I need to do my homework first.
Comments