Cars and Police, a Spring Boot streaming application using Kafka and ksqlDB
- Introduction
- Cars and Police
- A short introduction to ksqlDB
- Initialising the environment
- The Web Application
- Conclusions
Introduction
Recently I’ve started dabbling with ksqlDB, which is an “event-streaming database”, that operates on top of Apache Kafka, and makes working with streams “easy-peasy” (=declarative).
At least the promise is there, and even if I find ksqlDB a little rough around the edges, I’ve decided to give it a try, and build my own POC with it, called Cars and Police.
To clone the project and follow the explanations:
git clone https://github.com/nomemory/carsandpolice.git
Cars and Police
The purpose of the POC is to create a web app capable of displaying a “city map” with various cars in movement and their interactions with the police (not the band!).
- Various cars are “cruising” randomly inside a map (grid);
- Each time a car is crossing roads with the police, the driver’s papers are being checked. A ‘police stop’ event is being triggered;
- If the driver forgot his papers, a “car blocked event” is being triggered.
Visually (excuse my front-end skills) the application looks like this:
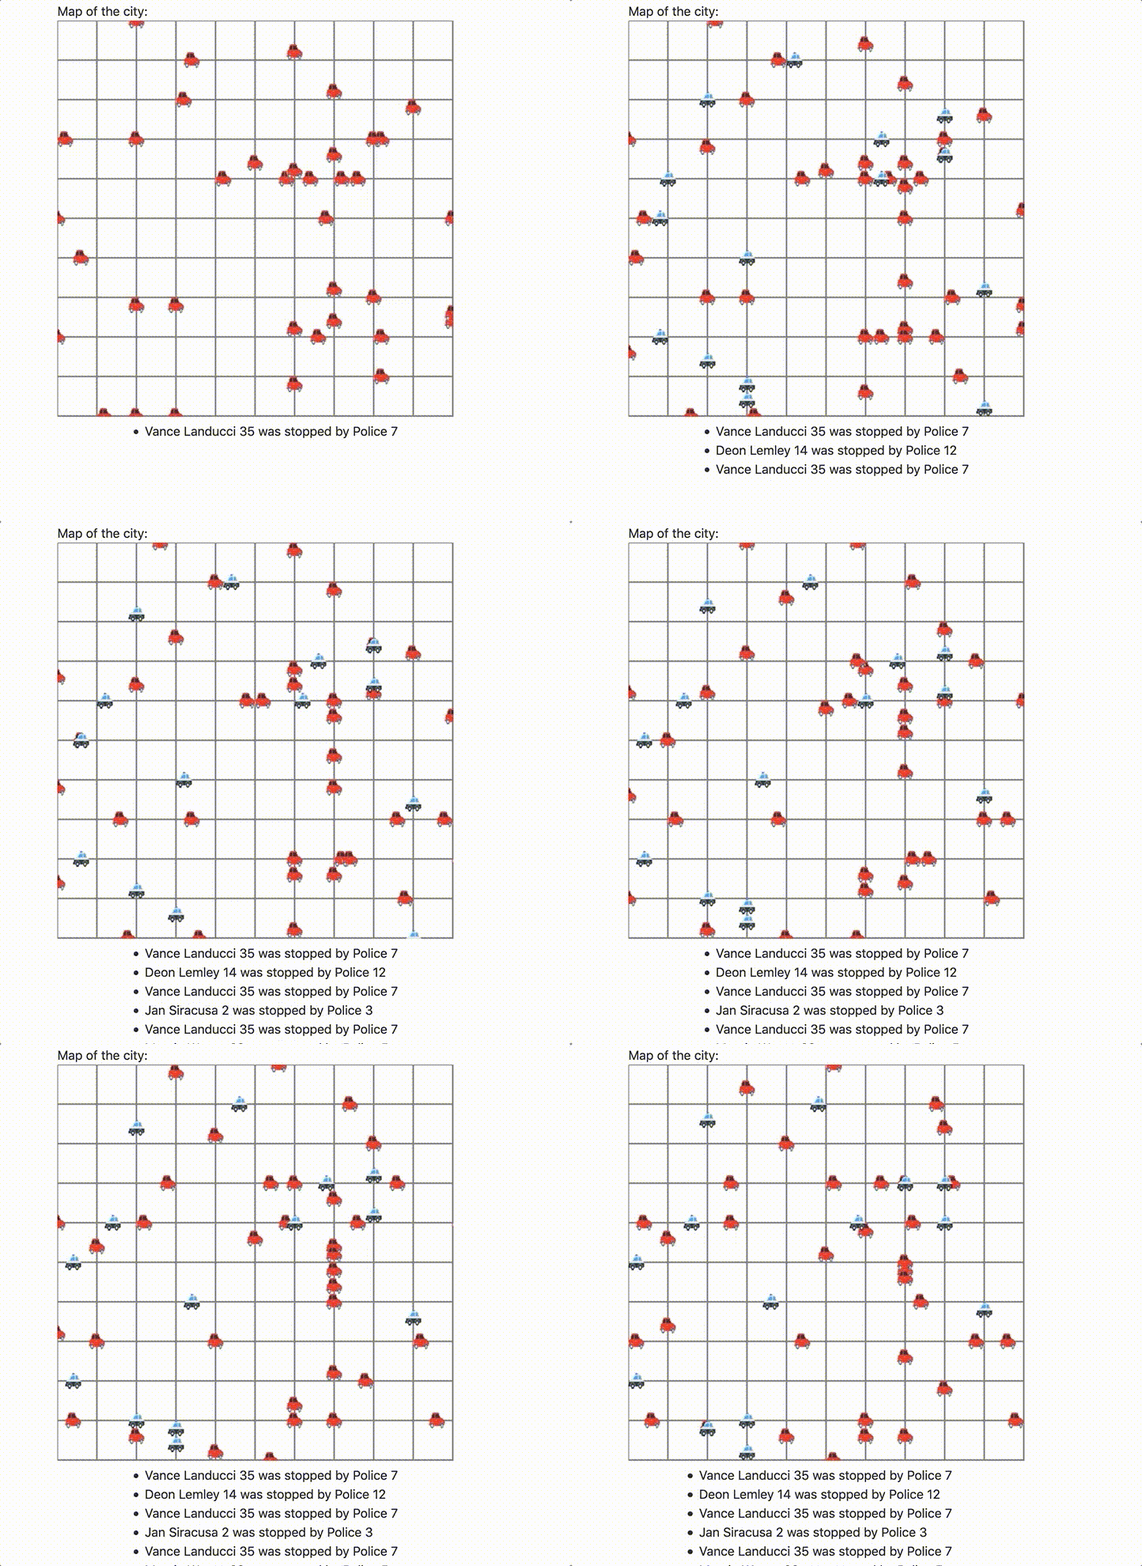
The canvas is getting “almost” real-time updates from the back-end and re-renders everything every second.
In this article, we are going to explain the way Cars and Police was architected and implemented.
Note: The tutorial assumes the reader is already familiar with key Kafka concepts (e.g.: topic), Spring Boot, STOMP/websockets and Reactive Programming. Some knowledge of mockneat is also advisable but not mandatory.
A short introduction to ksqlDB
Setting the environment
To run the Cars and Police POC, you will need a standalone instance of ksqlDB instance running. In the current example, ksqlDB will act as the main streaming orchestrator. Every event (car movement, police stop, car blocked) will go through and is going to be emitted by ksqlDB.
The easiest way to make it happen is to follow the official documentation.
I’ve used this docker-compose.yml file to get everything up. So, in the folder where you’ve copied the file, just run:
docker-compose start
If everything goes well, running a docker ps -a command will eventually render the following output:
CONTAINER ID   IMAGE                                             COMMAND                  CREATED      STATUS          PORTS                                        NAMES
d952b4011d71   confluentinc/cp-ksqldb-cli:6.1.0                  "/bin/sh"                7 days ago   Up 37 seconds                                                ksqldb-cli
b40daad5dcd5   confluentinc/ksqldb-examples:6.1.0                "bash -c 'echo Waiti…"   7 days ago   Up 37 seconds                                                ksql-datagen
1e87bcc418d7   confluentinc/cp-enterprise-control-center:6.1.0   "/etc/confluent/dock…"   7 days ago   Up 37 seconds   0.0.0.0:9021->9021/tcp                       control-center
0480a8d58b7d   confluentinc/cp-ksqldb-server:6.1.0               "/etc/confluent/dock…"   7 days ago   Up 39 seconds   0.0.0.0:8088->8088/tcp                       ksqldb-server
a410488ef8d5   confluentinc/cp-kafka-rest:6.1.0                  "/etc/confluent/dock…"   7 days ago   Up 40 seconds   0.0.0.0:8082->8082/tcp                       rest-proxy
b78c2fb6f9fc   cnfldemos/cp-server-connect-datagen:0.4.0-6.1.0   "/etc/confluent/dock…"   7 days ago   Up 40 seconds   0.0.0.0:8083->8083/tcp, 9092/tcp             connect
8124a8e14137   confluentinc/cp-schema-registry:6.1.0             "/etc/confluent/dock…"   7 days ago   Up 40 seconds   0.0.0.0:8081->8081/tcp                       schema-registry
051d84acf3bc   confluentinc/cp-zookeeper:6.1.0                   "/etc/confluent/dock…"   7 days ago   Up 41 seconds   2888/tcp, 0.0.0.0:2181->2181/tcp, 3888/tcp   zookeeper
Next, to connect to the ksqlDB container and run your first commands, just:
docker exec -it ksqldb-cli ksql http://ksqldb-server:8088
Key concepts (streams and joins)
Streams
A ksqlDB stream is a partitioned, immutable, append-only collection that represents a series of historical facts.
Usually, a stream is composed of a series of events.
For example, a car that moves from position (x,y) to position (x+1, y+1) inside a grid is called an event. All the car movements are forming a stream of events.
Let’s create our first stream:
CREATE STREAM carLocations
    (profileId VARCHAR, color VARCHAR, hasPapers BOOLEAN, location VARCHAR)
WITH
    (kafka_topic='carLocations', value_format='json', partitions=1);
Issuing commands can be done using
ksqldb-cli. To run it:docker exec -it ksqldb-cli ksql http://ksqldb-server:8088.
Explanation:
- Every stream works on-top of a Kafka Topic (
kafka_topic='carLocations'); - Our
carLocationsstream can be used to register events that contain the following information:profileId- a unique identifier for our cars;color- the color of the car;hasPapers- tells if the driver forgot his papers or not;location- the “x y” coordinates on a grid (map) kept in a string.
Before inserting a few events into our stream, let’s run a query to see in real-time how the events are getting appended to the stream one by one. In a separate ksqldb-cli instance run:
select * from carLocations emit changes;
Now, let’s insert a few events in our carLocations stream. You will see that the syntax of inserting new events is very similar to SQL; after all ksqlDB is a database:
INSERT INTO carLocations (profileId, color, hasPapers, location) VALUES ('Car A', 'Red', true, '0 1');
INSERT INTO carLocations (profileId, color, hasPapers, location) VALUES ('Car A', 'Red', true, '0 2');
INSERT INTO carLocations (profileId, color, hasPapers, location) VALUES ('Car B', 'BLUE', false, '5 3');
INSERT INTO carLocations (profileId, color, hasPapers, location) VALUES ('Car A', 'Red', true, '1 2');
If you switch to the select * window, you will see our car movement events getting appended to the stream (in real time):
ksql> select * from carLocations emit changes;
+---------------------------------------------------------+---------------------------------------------------------+---------------------------------------------------------+---------------------------------------------------------+
|PROFILEID                                                |COLOR                                                    |HASPAPERS                                                |LOCATION                                                 |
+---------------------------------------------------------+---------------------------------------------------------+---------------------------------------------------------+---------------------------------------------------------+
|Car A                                                    |Red                                                      |true                                                     |0 1                                                      |
|Car A                                                    |Red                                                      |true                                                     |0 2                                                      |
|Car B                                                    |BLUE                                                     |false                                                    |5 3                                                      |
|Car A                                                    |Red                                                      |true                                                     |1 2                                                      |
When you run a SELECT over a stream, the results are not something you would call “static”, new results are being emitted all the time when the given conditions are met.
Joins
Now that our first stream is up and running let’s create a new stream, called: policeLocations where we will keep the movement of potential police car movements.
CREATE STREAM policeLocations(profileId VARCHAR, location VARCHAR)
WITH (kafka_topic='policeCarLocations', value_format='json', partitions=1);
And now the interesting part, ksqlDB allows us to create a new stream by joining two or more existing streams.
So if we want, we can create a new stream called policeStops that will join both policeLocations and carLocations on the condition that the events have the exact location, within 10 seconds.
CREATE STREAM policeStops AS
    SELECT
        c.profileId AS carProfileId,
        p.profileId AS policeProfileId,
        c.hasPapers,
        c.location AS location
    FROM
        carLocations c
    INNER JOIN policeLocations p WITHIN 10 SECONDS ON c.location = p.location
    EMIT CHANGES;
Additionally, we can create a fourth stream, called carsBlocked that will contain only the policeStops events:
CREATE STREAM carsBlocked AS
    SELECT
        p.carProfileId,
        p.policeProfileId,
        p.location
    FROM
        policeStops p
    WHERE
        p.hasPapers = FALSE;
Because the following stream is not created through a JOIN, but only filters some events from policeStops, we don’t have to specify any WITHIN time interval.
To better understand how everything interacts, let’s take look at the following diagram:
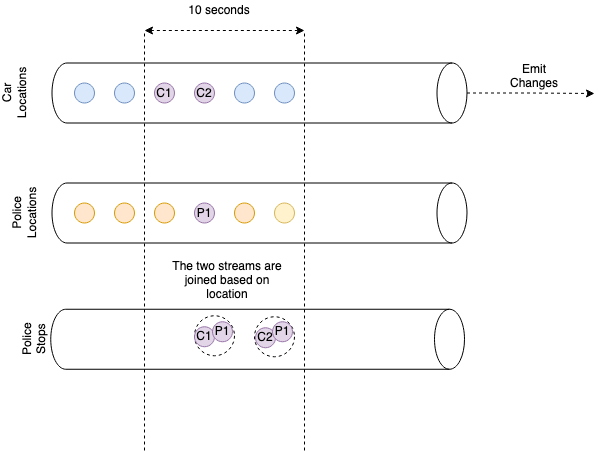
All the streams (carLocations, policeLocations and policeStops) are receiving input events, and in the same time when you select data from them, they emit changes.
C1, C2 and P1 are car movement events that have the same location; of course, their timestamp differs.
When policeStops is created by joining carLocations and policeLocations, (C1,P1) and (C2,P1) are aggregated together, and they become events for the policeStops stream.
WITHIN 10 SECONDS means that the events should happen in a frame of 10 seconds so that they can be joined.
Initialising the environment
All in all, to initialize our environment for running the carsandpolice app, the “DDL” script can be found here:
CREATE STREAM carLocations (profileId VARCHAR, color VARCHAR, hasPapers BOOLEAN, location VARCHAR)
  WITH (kafka_topic='carLocations', value_format='json', partitions=1);

CREATE STREAM policeLocations(profileId VARCHAR, location VARCHAR)
 WITH (kafka_topic='policeCarLocations', value_format='json', partitions=1);

CREATE STREAM policeStops AS
    SELECT
        c.profileId AS carProfileId,
        p.profileId AS policeProfileId,
        c.hasPapers,
        c.location AS location
    FROM
        carLocations c
    INNER JOIN policeLocations p WITHIN 10 SECONDS ON c.location = p.location
    EMIT CHANGES;

CREATE STREAM carsBlocked AS
    SELECT
        p.carProfileId,
        p.policeProfileId,
        p.location
    FROM
        policeStops p
    WHERE
        p.hasPapers = FALSE;
Going further
Streams and joins are not everything ksqlDB has to offer. Please check the official documentation to find out more about other interesting concepts:
- Materialised Views;
- Tables;
- Queries (PUSH, PULL);
- Time windows;
- User-defined methods;
- etc.
Link here.
The Web Application
Dependencies
carsandpolice is a typical Spring Boot application. I’ve bootstrapped it using Spring Initializr, and then I’ve added some additional libraries to make my life easier:
- Project Lombok to write less boilerplate;
- mockneat to help me with the generation of “arbitrary” events;
- The
ksqldb-api-client, so I can access ksqlDB from our Spring code; - WebJars so I can easily access the most popular web libraries from our web app;
When I wrote this article, I couldn’t find the ksqldb-api-client library in Maven Central so I’ve ended up adding a maven repo manually:
repositories {
	mavenCentral()
	maven {
		url "https://packages.confluent.io/maven/"
	}
}

dependencies {
  implementation group: 'io.confluent.ksql', name: 'ksqldb-api-client', version: '6.1.0'
}
Additionally, here is the link to the final build.gradle.
My model layer
Our model layer is composed by three main classes: Car.java, PersonalCar.java, PoliceCar.java, and 1 enum: Direction.java.
Each car moves inside the map (which you will see it’s actually modeled as a grid) in 4 possible directions which correspond to the cardinal points:
package net.andreinc.carsandpolice.model;

import lombok.Getter;

public enum Direction {

    NORTH(0, -1),
    SOUTH(0, 1),
    WEST(-1, 0),
    EAST(1, 0);

    @Getter
    private int x;
    @Getter
    private int y;

    public static Direction inverse(Direction direction) {
        switch (direction) {
            case SOUTH: return NORTH;
            case NORTH: return SOUTH;
            case EAST: return WEST;
            case WEST: return EAST;
        }
        throw new IllegalStateException();
    }
    Direction(int x, int y) {
        this.x = x;
        this.y = y;
    }
}
Car.java is an abstract class, where I will keep all the “commonalities” that specific to the cars of our system:
package net.andreinc.carsandpolice.model;

import com.fasterxml.jackson.annotation.JsonIgnore;
import com.fasterxml.jackson.annotation.JsonProperty;
import lombok.Data;
import lombok.NoArgsConstructor;

@Data
@NoArgsConstructor
public abstract class Car {

    private String profileId;

    @JsonIgnore
    private int x;

    @JsonIgnore
    private int y;

    private Direction direction;

    public void move(int movement) {
        this.x+=direction.getX() * movement;
        this.y+=direction.getY() * movement;
    }

    public void changeDirection(Direction direction) {
        this.direction = direction;
    }

    @JsonProperty("location")
    public String locationAsString() {
        return x + " " + y;
    }
}
So every car, regardless if it’s a PoliceCar or a PersonalCar will have:
- a
profileId- which represents a unique key that helps ksqlDB to identify it; - two coordinates
xandythat represent the car position inside the grid; - a
move()method that changes the coordinates of the car based on theDirectionof theCar.
We use
@JsonIgnoreonxandy. There’s currently a limitation that doesn’t allow us to join two streams based on two conditions. So we will keep aStringfield (location) concatenatingxandy.
The PoliceCar.java is exactly a Car.java, but it’s not abstract, so we can instantiate it:
@Data
@NoArgsConstructor
@EqualsAndHashCode(callSuper=false)
public class PoliceCar extends Car {
}
While, the PersonalCar.java have a few extra-fields:
@Data
@NoArgsConstructor
@EqualsAndHashCode(callSuper=false)
public class PersonalCar extends Car {
    private String color;
    private Boolean hasPapers;
}
One for the color (something I am not using in the UI), and a boolean hasPapers value to denote if it’s driver forgot or not the papers at home.
Data generation
Generating car movements was more difficult than I’d initially estimated. My first approach was to generate a set of interconnected roads procedurally, but for the sake of simplicity, I’ve opted for a simple grid.
The size of the grid, the number of “roads” (the perpendicular lines forming the grid), the number of police cars, the number of personal cars, their speed, etc. can be configured and changed from the application.properties file:
# Data configuration

personal.cars=40
police.cars=15
gridSize=501
step=50
movement=10
All the code related to the generation of cars, and their particular movements can be found in the CarsGenerator.java
The grid
Cars are moving inside a “symmetrical” grid of squares forming the city map.

As you can see:
gridSize=501- represents the width / height of grid. The grid is a square, sowidth=height;step=50- represents the width / height of the smaller squares composing the grid (has to be a divisor of(gridSize-1), usuallystep=(gridSize-1)/10);movement- represents the speed of the car, how much the car moves in one jump (has to be a divisor ofstep).
Generating the initial positions of the cars
When we first generate a random car on the grid, we don’t want the car to be generated outside the roads. In the below picture, the red squares represent all the possible initial car locations.
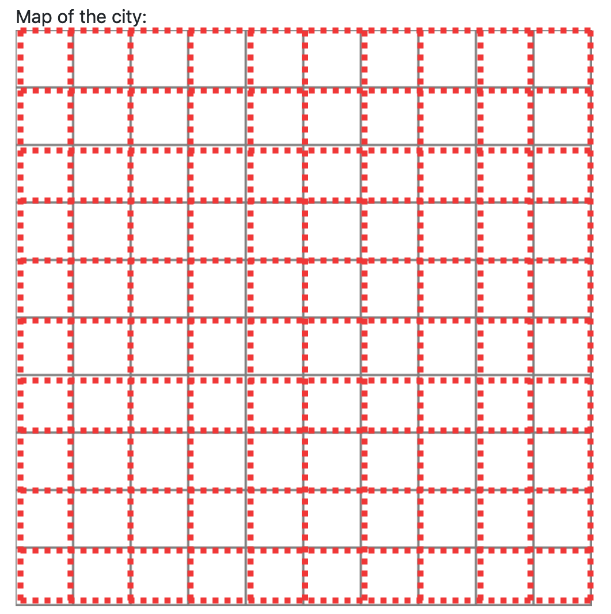
The distance between two red squares represents the movement parameter.
To determine those points, I’ve written the following method:
@Getter
private List<Pair<Integer, Integer>> roadsCoordinates = Collections.emptyList();

//....

private void initRoadCoordinates() {
    this.roadsCoordinates = new ArrayList<>();
    for(int i = 0; i < gridSize; i+=step) {
        for(int j = 0; j < gridSize; j+=movement) {
            roadsCoordinates.add(Pair.of(i, j));
            roadsCoordinates.add(Pair.of(j, i));
        }
    }
}
Moving an already placed car
The algorithm looks like this:
public void moveCarInGrid(Car car) {
    int x = car.getX();
    int y = car.getY();
    // Is intersection of roads
    if (x%step == 0 && y%step == 0) {
      // specific code here
      // car has to randomly decided if it changes the
      // direction or not
    }
    car.move(movement);
}
Normally a cars keeps its initial Direction, but whenever it reaches an intersection it can change it.
The condition to check if a car is an intersection (crossroad) is: x%step == 0 && y%step == 0, meaning (x, y) are both multiples of the step.
Not all crossroads are created equal, so we have to write an additional method that determines the possible directions in a given intersection. Without it, there’s a significant probability our cars will start exiting the grid when they move.
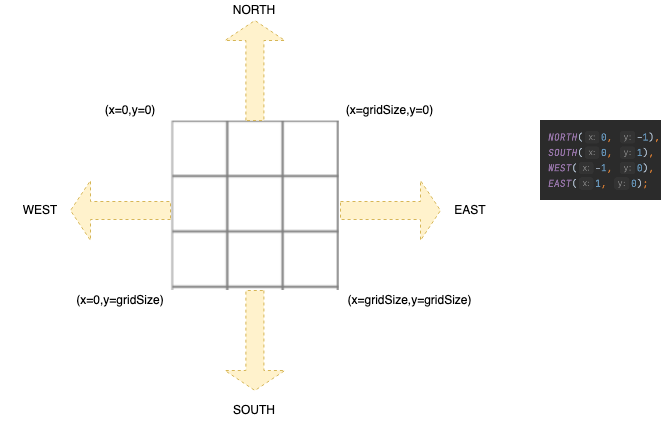
For example:
- if
x==0we cannot goWEST; - if
x==gridSize-1we cannot goEAST; - if
y==0we cannot goNORTH; - if
y==gridSize-1we cannot goSOUTH;
So the corresponding code for this algorithm is:
public void moveCarInGrid(Car car) {
    int x = car.getX();
    int y = car.getY();
    // Is intersection of roads
    if (x%step == 0 && y%step == 0) {
        List<Direction> directions = getPossibleDirectionsInIntersection(x, y);
        directions.remove(inverse(car.getDirection()));
        car.setDirection(from(directions).get());
    }
    car.move(movement);
}

public List<Direction> getPossibleDirectionsInIntersection(int x, int y) {
    Set<Direction> possibleDirections = new HashSet<>(of(NORTH, SOUTH, EAST, WEST));
    if (x==0) possibleDirections.remove(WEST);
    if (y==0) possibleDirections.remove(NORTH);
    if (x==gridSize-1) possibleDirections.remove(EAST);
    if (y==gridSize-1) possibleDirections.remove(SOUTH);
    return new ArrayList<>(possibleDirections);
}
Another method that is important to have is called getPossibleDirections(x,y). This is useful when setting the initial Direction of a car:
public List<Direction> getPossibleDirections(int x, int y) {
    if (x%step==0 && y%step==0) {
        return getPossibleDirectionsInIntersection(x, y);
    }
    if (x%step==0)
        return List.of(NORTH, SOUTH);
    if (y%step==0)
        return List.of(EAST, WEST);
    return List.of(EAST, WEST, NORTH, SOUTH);
}
Generating cars
The various Car objects are generated using mockneat. If you have never used the library before, I recommend you to give it a try and read the tutorial.
In short, mockneat is an arbitrary data-generator open-source library written in Java, that provides a simple but powerful (fluent) API that enables developers to create json, xml, csv and sql data programmatically. It can also act as a powerful Random substitute or a mocking library.
Anyway, to generate the two lists List<PersonalCar> and List<PoliceCar>, the code is quite straightforward:
@Value("${personal.cars}")
private int personalCarsNumber;

private void initPersonalCars() {
    personalCarsIds =
            fmt("#{name} #{seq}")
                    .param("name", names().full())
                    .param("seq", intSeq());

    this.personalCars =
            filler(() -> new PersonalCar())
                    .setter(PersonalCar::setProfileId, personalCarsIds)
                    .setter(PersonalCar::setColor, from(colors))
                    .setter(PersonalCar::setHasPapers, bools().probability(75.0))
                    .map(obj -> {
                        Pair<Integer, Integer> pos = from(roadsCoordinates).get();
                        int x = pos.getLeft();
                        int y = pos.getRight();
                        obj.setX(x);
                        obj.setY(y);
                        Direction direction = from(getPossibleDirections(x, y)).get();
                        obj.setDirection(direction);
                        return obj;
                    })
                    .list(personalCarsNumber)
                    .get();
}
And:
@Value("${police.cars}")
private int policeCarsNumber;

private void initPoliceCars() {
    policeCarsIds =
            fmt("Police #{seq}")
                    .param("seq", intSeq());

    policeCars =
            filler(() -> new PoliceCar())
                    .setter(PoliceCar::setProfileId, policeCarsIds)
                    .setter(PoliceCar::setDirection, from(Direction.class))
                    .map(obj -> {
                        Pair<Integer, Integer> pos = from(roadsCoordinates).get();
                        int x = pos.getLeft();
                        int y = pos.getRight();
                        obj.setX(x);
                        obj.setY(y);
                        Direction direction = from(getPossibleDirections(x, y)).get();
                        obj.setDirection(direction);
                        return obj;
                    })
                    .list(policeCarsNumber)
                    .get();
}
To better understand the magic behind the code, please check the following methods:
To check all the code responsible for generating random cars and random movement events, please check the following class: CarsGenerator.java
Interacting with ksqlDB from Java
The interaction with ksqlDB is done through the io.confluent.ksql.api.client.Client class.
To set up the Client we can simply write a configuration @Component:
package net.andreinc.carsandpolice.config;

import io.confluent.ksql.api.client.Client;
import io.confluent.ksql.api.client.ClientOptions;
import org.springframework.beans.factory.annotation.Autowired;
import org.springframework.beans.factory.annotation.Value;
import org.springframework.context.annotation.Bean;
import org.springframework.stereotype.Component;

/**
 * This class is responsible with the configuration of the ksqldb client.
 */
@Component
public class KsqlDbConfig {

    @Value("${ksqldb.host}")
    public String ksqlDbHost;

    @Value("${ksqldb.port}")
    public Integer ksqlDbPort;

    @Autowired
    Client client;

    @Bean
    public Client ksqlDbClient() {
        ClientOptions options = ClientOptions.create()
                .setHost(ksqlDbHost)
                .setPort(ksqlDbPort);
        Client client = Client.create(options);
        return client;
    }
}
By default, the values for ksqldb.host and ksqldb.port are:
ksqldb.host=localhost
ksqldb.port=8088
Inserting events into a stream
Now that client is configured, we can write a @Service responsible for inserting events into the two streams: carLocations and policeLocations.
Normally, the interaction with the “database” shouldn’t be done at the @Service layer, but for the sake of simplicity, we will leave it like this.
package net.andreinc.carsandpolice.service;

import com.fasterxml.jackson.databind.ObjectMapper;
import io.confluent.ksql.api.client.Client;
import io.confluent.ksql.api.client.KsqlObject;
import net.andreinc.carsandpolice.model.PersonalCar;
import net.andreinc.carsandpolice.model.PoliceCar;
import org.springframework.beans.factory.annotation.Autowired;
import org.springframework.beans.factory.annotation.Value;
import org.springframework.stereotype.Service;

import java.util.Map;
import java.util.concurrent.ExecutionException;

@Service
public class CarsAndPoliceService {

    // ${stream.carlocations} == "carLocations"
    @Value("${stream.carlocations}")
    private String carLocationsStream;

    // "${stream.policelocations}" == "policeLocations"
    @Value("${stream.policelocations}")
    private String policeLocationsStream;

    @Autowired
    private Client client;

    @Autowired
    private ObjectMapper objectMapper;

    public void insertPersonalCar(PersonalCar personalCar) {
        Map<String, Object> map = objectMapper.convertValue(personalCar, Map.class);
        KsqlObject insert = new KsqlObject(map);
        try {
            client.insertInto(carLocationsStream, insert).get();
        } catch (InterruptedException | ExecutionException e) {
            e.printStackTrace();
        }
    }

    public void insertPoliceCar(PoliceCar policeCar) {
        Map<String, Object> map = objectMapper.convertValue(policeCar, Map.class);
        KsqlObject insert = new KsqlObject(map);
        try {
            client.insertInto(policeLocationsStream, insert).get();
        } catch (InterruptedException | ExecutionException e) {
            e.printStackTrace();
        }
    }
}
The key class for inserting (or retrieving) information in ksqlDB is the KsqlObject.
Lucky for us a KsqlObject can be constructed from a Map<String, Object>, that’s why we can use jackson’s ObjectMapper to transform our PersonalCar or PoliceCar instances into the corresponding Map<String, Object> representation.
The next step will be to periodically insert our moving cars in the corresponding streams (policeLocations and carLocations). For this we will make us of Spring’s capabilities of scheduling tasks.
To enable the @Scheduled annotation, we will need to “decorate” our main class CarsAndPoliceApplication.java with @EnableScheduling.
And then we can write a “job”-like class, that is sending to the streams new car movements events every few seconds:
import net.andreinc.carsandpolice.model.generators.CarsGenerator;
import net.andreinc.carsandpolice.service.CarsAndPoliceService;
import org.springframework.beans.factory.annotation.Autowired;
import org.springframework.scheduling.annotation.Scheduled;
import org.springframework.stereotype.Component;

import java.util.concurrent.atomic.AtomicBoolean;

@Component
public class CarMovementsProducerJob {

    @Autowired
    private CarsAndPoliceService service;

    @Autowired
    private CarsGenerator vehicleMocks;

    private AtomicBoolean onoff = new AtomicBoolean(true);

    /**
     * Turn on or off the producing of Car movements.
     */
    public void toggle() {
        boolean temp;
        do {
            temp = onoff.get();
        } while(!onoff.compareAndSet(temp, !temp));
    }

    public boolean isOn() {
        return onoff.get();
    }

    // Sends events to the "carLocations" stream second
    @Scheduled(fixedDelay = 1000)
    public void emitPersonalCarEvents() {
        if (isOn()) {
            vehicleMocks.getPersonalCars().forEach(c -> {
                vehicleMocks.moveCarInGrid(c);
                // Inserts into the "carLocations" stream
                service.insertPersonalCar(c);
            });
        }
    }

    // Sends events to the "policeLocations" stream every 5 seconds
    @Scheduled(fixedDelay = 5000)
    public void emitPoliceCarEvents() {
        if (isOn()) {
            vehicleMocks.getPoliceCars().forEach(pc -> {
                vehicleMocks.moveCarInGrid(pc);
                // Inserts onto the "policeCars" stream
                service.insertPoliceCar(pc);
            });
        }
    }
}
A nice-to-have feature is to implement an ON/OFF switch for our JOB - this explains the toggle() method.
For example in the above code our methods:
emitPoliceCarEvents()will be called every 5 seconds (fixedDelay = 5000), as long as the application runs;emitPersonalCarEventswill be called every second (fixedDelay = 1000), as long as the application runs;
At this point, if we start the application as-it-is (without the web interface), and we run a SELECT one of the streams, we will see our events flowing:
select * from carLocations emit changes;
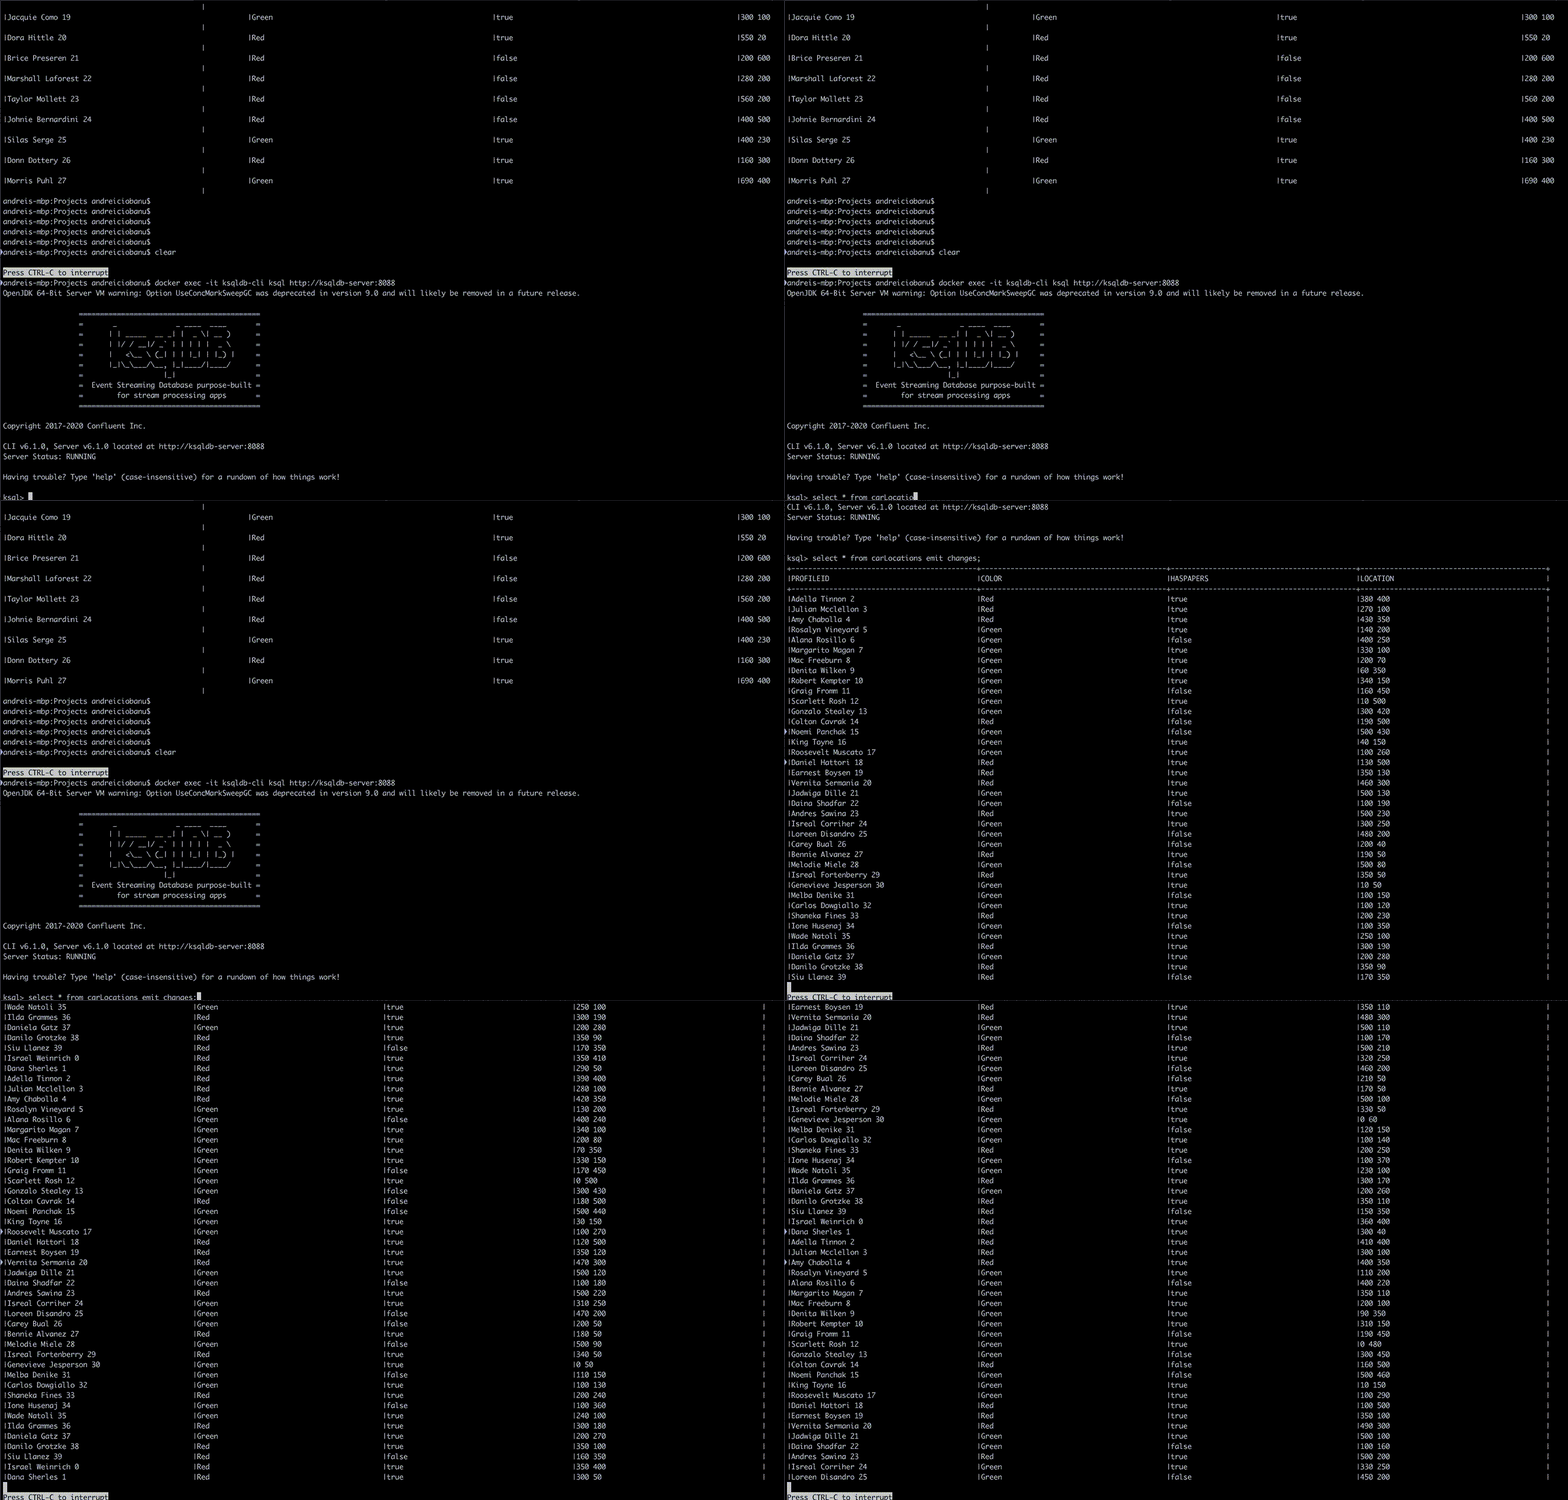
We will get similar results for all the streams we query.
Reading events from a Stream
As you’ve rightly guessed, querying a ksqlDB stream in Java is done through the io.confluent.ksql.api.client.Client instance we’ve configured before.
The biggest difference lies in the fact that our SELECT emit changes, so querying data is a long-running process. Invoking client.streamQuery(query) will return a CompletableFuture<StreamedQueryResult>, where the StreamingQueryResult is actually an org.reactivestreams.Producer<Row>.
To help me reduce the boiler-plate code, I’ve written my (own) util class for querying, called KsqlDbStreamingQuery:
@Component
public class KsqlDbStreamingQuery {

    @Autowired
    protected Client client;

    public void query(String query, Consumer<Row> rowConsumer) {
        client.streamQuery(query)
                .thenAccept(streamedQueryResult -> {
                    streamedQueryResult.subscribe(new Subscriber<Row>() {
                        private Subscription subscription;

                        @Override
                        public void onSubscribe(Subscription s) {
                            this.subscription = s;
                            subscription.request(1);
                        }

                        @Override
                        public void onNext(Row row) {
                            rowConsumer.accept(row);
                            subscription.request(1);
                        }

                        @Override
                        public void onError(Throwable t) {
                        }

                        @Override
                        public void onComplete() {
                        }
                    });
                });
    }
}
The most important part is this:
@Override
public void onNext(Row row) {
    rowConsumer.accept(row);
    subscription.request(1);
}
Every time the Stream emits a change, I’ve defined a Consumer<Row> that will take care of that event.
For example, writing a query for the carLocations stream looks like this:
@Component
public class PersonalCarMovementStreamingQuery {

    @Autowired
    private KsqlDbStreamingQuery ksqlDbStreamingQuery;

    @PostConstruct
    public void carLocations() {
        ksqlDbStreamingQuery.query("select * from carLocations emit changes;", (row)->{
            // Do something with the ROW
            // e.g. send the data through a weksocket to the client
        });
    }
}
All our queries can be found in the net.andreinc.carsandpolice.query package:
- CarsBlockedStreamingQuery.java
- PersonalCarMovementStreamingQuery.java
- PoliceCarMovementStreamingQuery.java
- PoliceStopsStreamingQuery.java
Websockets!
Now that the back-end is almost complete and our events are being constantly generated. The next step is to start preparing for the client.
Our events are going to be sent to the client (browser) through STOMP (with WebSockets as the underlying mechanism).
In our particular case, think of STOMP and WebSockets as having the same relationship as HTTP and TCP. STOMP, compared to a basic WebSockets implementation, provides us with a handful of abstractions.
Back-end configuration
Websockets/STOMP support in Spring is very good, so to make things going, it’s simply a matter of configuration:
package net.andreinc.carsandpolice.config;

import org.springframework.context.annotation.Configuration;
import org.springframework.messaging.simp.config.MessageBrokerRegistry;
import org.springframework.web.socket.config.annotation.EnableWebSocketMessageBroker;
import org.springframework.web.socket.config.annotation.StompEndpointRegistry;
import org.springframework.web.socket.config.annotation.WebSocketMessageBrokerConfigurer;

@Configuration
@EnableWebSocketMessageBroker
public class WebSocketConfig implements WebSocketMessageBrokerConfigurer {

    @Override
    public void configureMessageBroker(MessageBrokerRegistry registry) {
        registry.enableSimpleBroker("/queue", "/topic");
        registry.setApplicationDestinationPrefixes("/app");
    }

    @Override
    public void registerStompEndpoints(StompEndpointRegistry registry) {
        registry.addEndpoint("/websocket-sockjs-stomp").withSockJS();
    }
}
At this point, from a back-end perspective, everything is set. We can start sending messages to the client using the: org.springframework.messaging.simp.SimpMessagingTemplate class.
For example our long-running streaming queries (CarsBlockedStreamingQuery.java, PersonalCarMovementStreamingQuery.java, PoliceCarMovementStreamingQuery.java, PoliceStopsStreamingQuery.java) can start pushing messages to the client by simply:
@Autowired
private SimpMessagingTemplate simpMessagingTemplate;

// ----

ksqlDbStreamingQuery.query("select * from carLocations emit changes;", (row)->{
    Map<String, Object> objectMap = row.asObject().getMap();
    simpMessagingTemplate.convertAndSend("/topic/carlocations", objectMap);
});

// ----
In the above code, the query that runs on top of the carLocations stream will push every event to the client in the /topic/carlocations endpoint.
Another important step is to send some initial information to the client (once per client). Mainly configurations coming from the back-end:
/**
 * One time message sent to the clients
 * The message contains the grid size so they can draw the grid in the canvas
 */
@SubscribeMapping("/subscribe")
public Map<String, Object> sendOneTimeMessage() {
    return Map.of(
    "gridSize", gridSize,
    "step", step
    );
}
The above back-end code is triggered only once (per client), we basically send the size of the grid (gridSize), and the step (step) so that the client can start rendering the canvas.
Front-end configuration
To make our Front-End “listen” to the events that are being pushed directly from the ksqlDB queries we need to do new configurations (this time on the client):
// When the dom gets loaded
document.addEventListener("DOMContentLoaded", function() {

    // we setup the underlying endpoint for stomp
    var stomp = webstomp.over(new SockJS('/websocket-sockjs-stomp'));
    stomp.connect({}, function (frame) {

        stomp.subscribe('/app/subscribe', function (response) {
          // this code will trigger once, when the connection is established
          // here we receive the gridSize and the step
        });

        stomp.subscribe('/topic/carlocations', function (response) {
           // events coming from the stream `carLocations` are consumed here
        });

        stomp.subscribe('/topic/policelocations', function(response) {
          // events coming from the stream `policeLocations` are consumed here
        });

        stomp.subscribe('/topic/carsblocked', function(response) {
          // events coming from the stream `carsblocked` are consumed here
        });

        stomp.subscribe('/topic/policestops', function(response) {
          // events coming from the stream `policeStops` are consumed here
        });


        const subscription = stomp.subscribe('/queue/responses', function (response) {
        });

        stomp.subscribe('/queue/errors', function (response) {
        });
    });
In the above code, firstly we are creating a stomp object:
webstomp.over(new SockJS('/websocket-sockjs-stomp'))`
It’s important to notice the /websocket-sockjs-stomp endpoint is the one we registered in our back-end code (in the previous chapter):
@Override
public void registerStompEndpoints(StompEndpointRegistry registry) {
    registry.addEndpoint("/websocket-sockjs-stomp").withSockJS();
}
The next step after we call stomp.connect is to subscribe to the topics (and queues):
stomp.subscribe('/app/subscribe', function (response) {
  // this code will trigger once, when the connection is established
  // here we receive the gridSize and the step
});

stomp.subscribe('/topic/carlocations', function (response) {
   // events coming from the stream `carLocations` are consumed here
});

// etc.
For example if we want to read the gridSize and the step that are sent from the back-end with this code:
@SubscribeMapping("/subscribe")
public Map<String, Object> sendOneTimeMessage() {
    return Map.of(
    "gridSize", gridSize,
    "step", step
    );
}
We need to change our .js code in the following manner:
stomp.subscribe('/app/subscribe', function (response) {
  var json = JSON.parse(response.body)
  console.log(json.gridSize)
  console.log(json.step)
});
Or if we want to read a carLocation event that is sent from this back-end code (see: PersonalCarMovementStreamingQuery.java) :
ksqlDbStreamingQuery.query("select * from carLocations emit changes;", (row)->{
    Map<String, Object> objectMap = row.asObject().getMap();
    simpMessagingTemplate.convertAndSend("/topic/carlocations", objectMap);
});
We will change the .js code accordingly:
stomp.subscribe('/topic/carlocations', function (response) {
    var json = JSON.parse(response.body)
    var loc = json["LOCATION"].split(" ")
    // Extract the x and y from ["LOCATION"]
    json.x = parseInt(loc[0])
    json.y = parseInt(loc[1])
    console.log(json)
});
The canvas
The grid
Now that the communication channel between Front-End and Back-End has been established through STOMP/websockets, we can focus on the way we represent the data.
To render the moving cars:

in our html code we add a <canvas/> component:
<div class="row justify-content-md-center">
    <div class="column">
        <div>Map of the city:</div>
        <canvas id="grid"></canvas>
    </div>
</div>
As you can see, the canvas doesn’t have a width, or a height. Those are properties we set in the .js code and are coming from the server (once per session, as we discussed in the previous chapter):
stomp.subscribe('/app/subscribe', function (response) {
    var json = JSON.parse(response.body)
    var canvas = document.getElementById("grid")
    canvas.width = json.gridSize;
    canvas.height = json.gridSize;
    canvas.step = json.step;
});
The next step is to draw the road network (the grid). For this, I’ve got inspired by this wonderful tutorial.
Nevertheless, the code for drawing the grid is quite straightforward:
function drawGrid() {
    var canvas = document.getElementById("grid")
    var ctx = canvas.getContext("2d")
    var gridSize = canvas.height
    var step = canvas.step

    ctx.save()
    ctx.strokeStyle = 'gray'
    ctx.fillStyle = 'black'
    ctx.lineWidth = 2

    for(let x = 0; x < gridSize; x+=step) {
        ctx.beginPath()
        ctx.moveTo(x, 0)
        ctx.lineTo(x, gridSize)
        ctx.stroke()
    }

    for (let y = 0; y < gridSize; y += step) {
      ctx.beginPath()
      ctx.moveTo(0, y)
      ctx.lineTo(gridSize, y)
      ctx.stroke()
    }

    ctx.restore()
}
If we simply call the drawGrid() function once, the results will look like:

Animating everything
Our Front-End needs to have a “state” where it keeps all the car positions at every given moment.
For the sake of simplicity, we will keep a global variable, var cars = new Map() of type Map, where we keep both the personal cars and the police cars that are coming from the server.
Each time an event (coming from the back-end) is received we update the specified car from our Map:
 stomp.subscribe('/topic/carlocations', function (response) {
    var body = response.body
    var json = JSON.parse(response.body)
    var loc = json["LOCATION"].split(" ")
    json.x = parseInt(loc[0])
    json.y = parseInt(loc[1])
    cars.set(json["PROFILEID"], json)
});

stomp.subscribe('/topic/policelocations', function(response) {
    var body = response.body
    var json = JSON.parse(response.body)
    var loc = json["LOCATION"].split(" ")
    json.police = true
    json.x = parseInt(loc[0])
    json.y = parseInt(loc[1])
    cars.set(json["PROFILEID"], json)
});
By doing this we are making sure our Front-End “state” is all the time in sync with whatever is happening in the Back-End.
For curiosity, if we open the browser console, we can see our client is “assaulted” with updates coming from the back-end:

And now the final step is to write the animation method, the one that renders the cars on the canvas:
var framesPerSecond = 1
function drawCars() {

    var policeCar = new Image()
    policeCar.src = "policecar.png"

    var personalCar = new Image()
    personalCar.src = "personalcar.png"

    var canvas = document.getElementById("grid")
    var ctx = canvas.getContext("2d")

    ctx.clearRect(0, 0, canvas.width, canvas.height);
    drawGrid()

    cars.forEach(function(value, key, map) {
        if (value.police == true) {
            ctx.drawImage(policeCar, value.x -10, value.y - 10, 20, 20)
        } else {
            ctx.drawImage(personalCar, value.x -10, value.y - 10, 20, 20)
        }
    })

    // This is important for controlling the number of frames per second
    setTimeout(function() {
        window.requestAnimationFrame(drawCars)
    }, 1000 / framesPerSecond)
}
Conclusions
- ksqlDB is not yet fully baked, but it’s a promising technology. I will definitely keep an eye on it;
- The code of this POC can be optimized further. It’s probably a bad idea to stream directly in the browser; maybe events can come up in batches;
- Instead of using STOMP/WebSocket we can use an SSE technology given the communication is done mainly from the server to the client;

Comments